
Take a little time to bake my Dutch Oven Bread: Bread for beginners, which is fantastic, simple, and tasty in your kitchen.
I have been making this bread for many, many years, and not every time came out perfect, but it never stopped me from making it all over again. I have about 25 years of experience making this bread, and about 30 years when began cooking. I started to cook somewhere around the age of 11, at 12 years old I made my first bread and it was like a pancake. I forgot to add yeast, haha!
For me, bread is life. I love bread with all my heart, especially this tasty Dutch oven bread.
Dutch Oven Bread: Bread for beginners
From time to time, I do remove carbs and gluten from my diet, but I am telling you it is so hard. Just like potatoes, I adore bread so much.
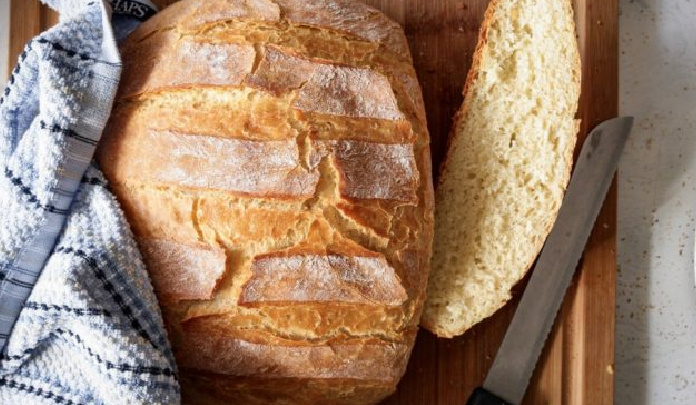
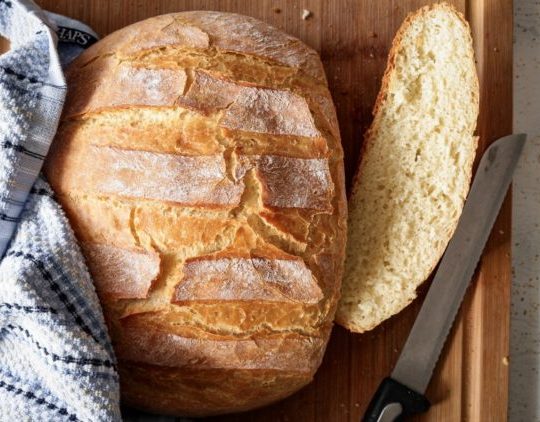
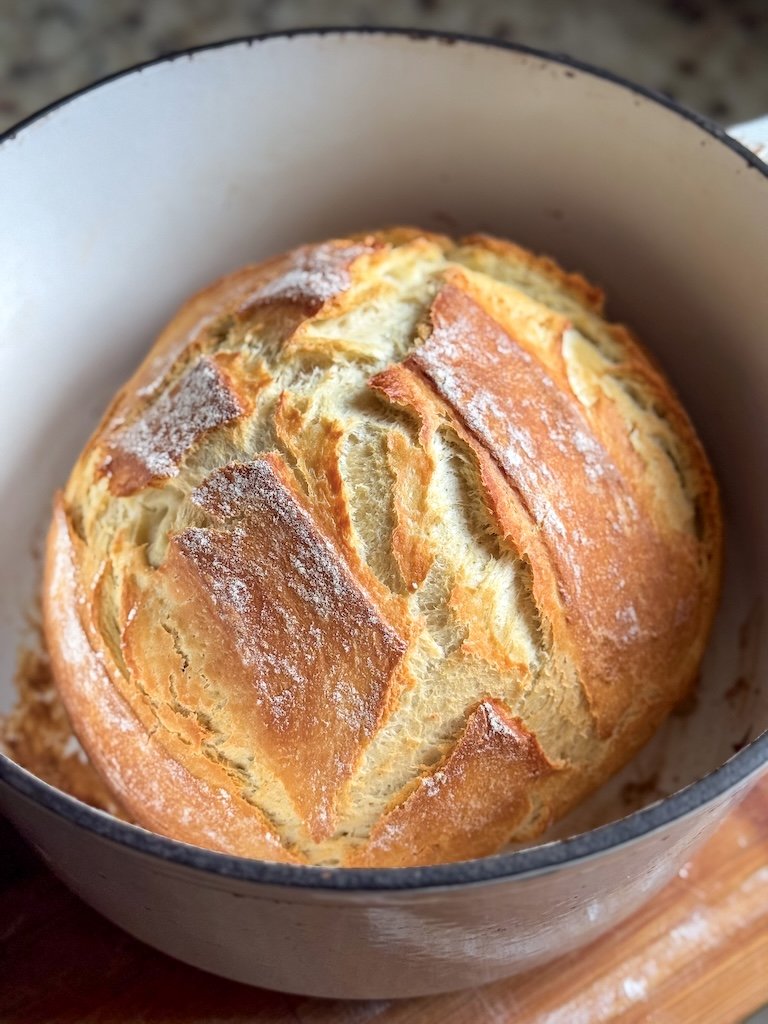
Anyhow, this time, I am sharing straightforward bread, and it comes out so flawlessly that you will not even believe it. Dutch ovens distribute heat all around, and the bread is secured in the middle. It allows the bread to be baked evenly and beautifully.
While it’s baking, the heat captured inside also makes the bread produce steam, so the bread comes out amazing. When you use parchment paper, the bread comes out even better.
TAP HERE FOR MORE TASTY BREAD RECIPES
On the other hand, you can most definitely use only a drizzle of good oil and a sprinkle of cornmeal to prevent the bread from sticking. As I said so many times, I have made bread daily for a long time, and my family loves it.
If you never made bread, please do consider trying. My NO-KNEAD BREAD is one of the most popular recipes on my blog. You can even bake that bread in a Dutch oven. It is so easy and most definitely delicious.
I have been making bread for over 20 years so I could make it with my eyes closed, so I tried to explain the best I could so you guys could make it at home.
Why a Dutch Oven?
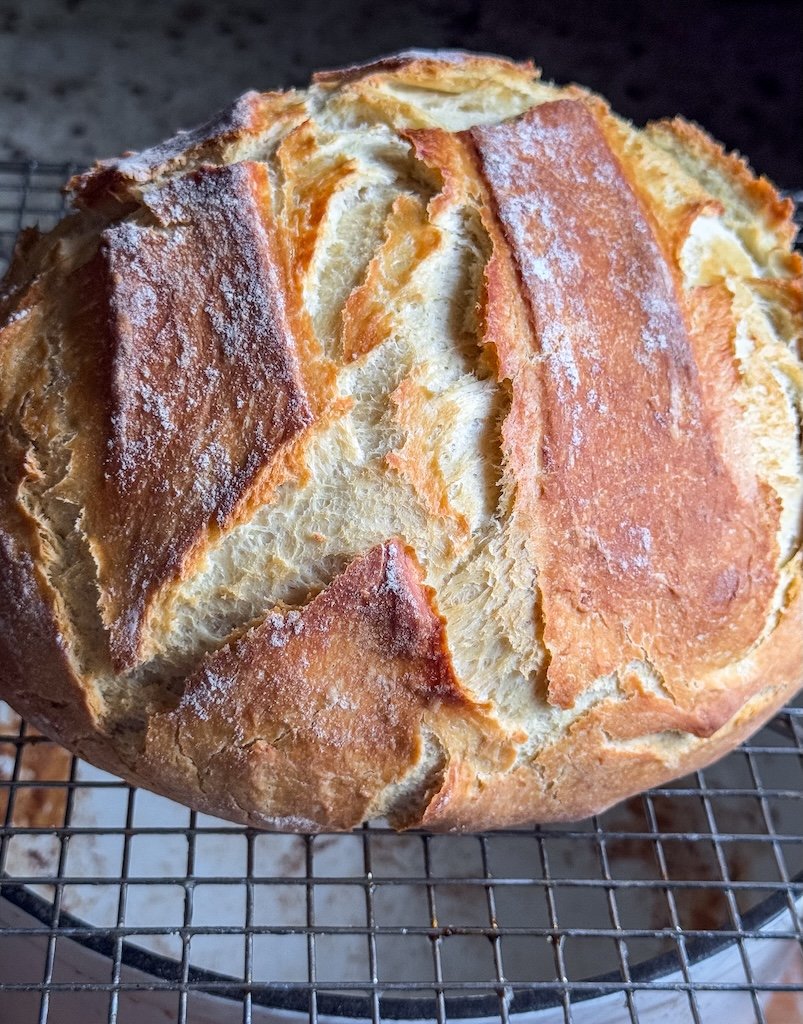
The Dutch oven traps steam, which gives the bread its crispy crust and soft, airy interior—just like professional bakery loaves.
I made this Dutch Oven Bread: Bread for beginners in Xtrema Ceramic Cookware (Ceramcor) Dutch Oven. However, I also tested the same in their 2.5 Qt Covered Saucepan and 3.5 Qt Covered Saucepan, and 10″ Covered Short Handled Skillet. Well, I got to tell you it was amazing.
I love Xtrema Cookware and Bakeware, so do check them out. Also, I made it in other Dutch ovens as well. Whatever pan you have that is deeper and with a fitted lid, I know you can use it.
This bread recipe can be made in smaller or larger than 3.5 qt. The dough will either expand and fill the gap or bake higher.
Dutch Oven that I recommend:
- Lodge 6 Quart Enameled Cast Iron Dutch Oven. Classic Red Enamel Dutch Oven
- Cast Iron Dutch Ovens With Lid Dual Handle Enameled Dutch Oven, 3.5 Quart, White
Step-by-Step Tips:
- Use lukewarm water or milk to help the yeast activate properly.
- Let the dough rise in a warm spot for 1–2 hours, or overnight for a more complex flavor.
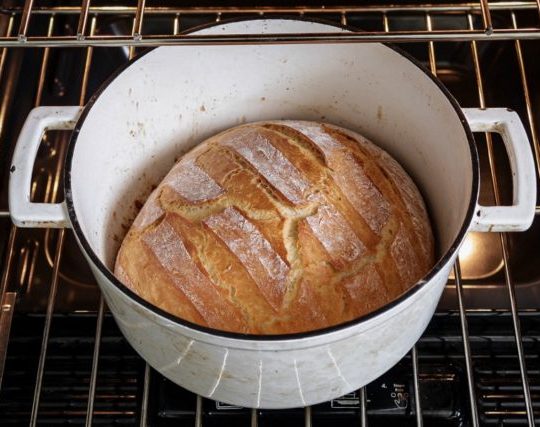
- Preheat the Dutch oven in the oven for about 30 minutes before baking to ensure a crispy crust.
- Use a sharp knife or razor blade to score the dough so it rises beautifully in the oven.
Personalize Your Loaf:
- Add mix-ins like herbs, garlic, cheese, seeds, or dried fruits.
- Try different flours, like whole wheat or rye, for unique flavors.
Don’t Worry About Perfection:
- The beauty of homemade bread is its rustic charm—every loaf has its own character.
If you make my Dutch Oven Bread for beginners, please tag me on Instagram. @sandraseasycooking Thank you so much for your attention and participation.
My New Website Mug of Reality is Live Now!
I will have more baking recipes on my new lifestyle website and some step-by-step instructions, and printables regarding baking bread.

Dutch Oven Bread
I call it the best because it is so easy yet really delicious.
Ingredients
- 1 cup warm milk, 240ml (you may use water if you do not have milk)
- 1/4 teaspoon sugar (1g)
- 1 pack dry active yeast, about 2 teaspoons
- 5 cups All-Purpose Flour (625g) + some for dusting, about 1/4 cup more (1 cup AP flour=125g)
- 1 tablespoon salt (18g)
- 1/2 cup Lukewarm water add a splash extra if needed (120ml)
- 1 egg, mixed, optional
- 1 tablespoon Olive Oil + for greasing
Instructions
- Stir the yeast packet into warm-to-touch milk and sugar and allow the yeast to bloom for about 5 to 10 minutes. When it starts to bubble and foam, it means the yeast is active and ready to be used.
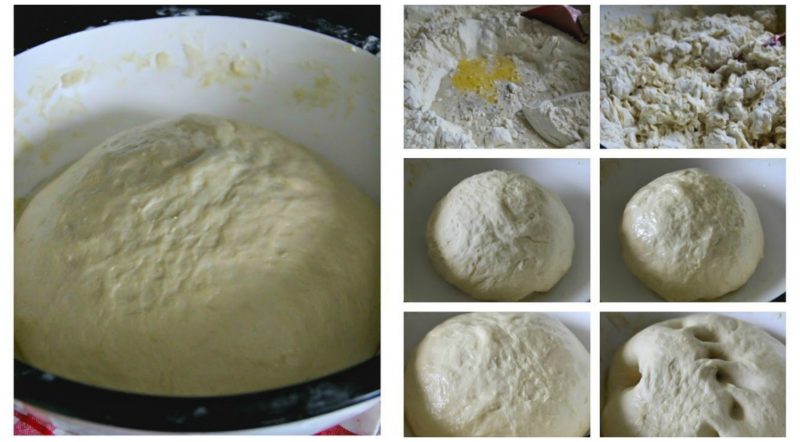
- In a large bowl, mix flour and salt, then create a small well in the middle and pour in the milk and yeast mixture.
- Mix one egg with warm water, and add to the flour.
- Using your wooden spoon or spatula, start combining everything. Once combined using your hands, begin to knead the dough; when it starts to pull away from the sides of the bowl, it is ready to rest. You don't need to over-knead it since it doesn't need a lot, but you do need to combine everything together, I knead for about 3 to 5 minutes. If the dough is too sticky, add more flour, a couple of tablespoons at a time, and vice versa, add a splash more water if it's too dry—drizzle olive oil and tap/glaze all over the dough.
- Cover the bowl with a large kitchen towel and let it rise until it doubles in size. It takes an hour or two hours, sometimes less if the house is warmer.
- Uncover the dough and give it a few pokes with your finger. If the dough has risen properly, it should indent under the pressure of your fingers and slowly deflate.
- Using your hand, fold the dough—light pressure-kneading. Add more flour until it comes together. Cover and let it rise for one more hour.
- Preheat the oven to 450 F
- Once the dough has doubled once again, knead it again to shape it.
- Place the shaped dough into a lightly greased or parchment-lined Dutch oven, and let it rise in the warmer area for an additional 30 minutes. Sprinkle the top with a bit of flour and score lines on top. As the bread bakes, it will expand, and those scored lines will become more visible. Also, you could preheat the enameled Dutch oven before baking. You can also heat it on the stovetop for a minute just to break the coldness.
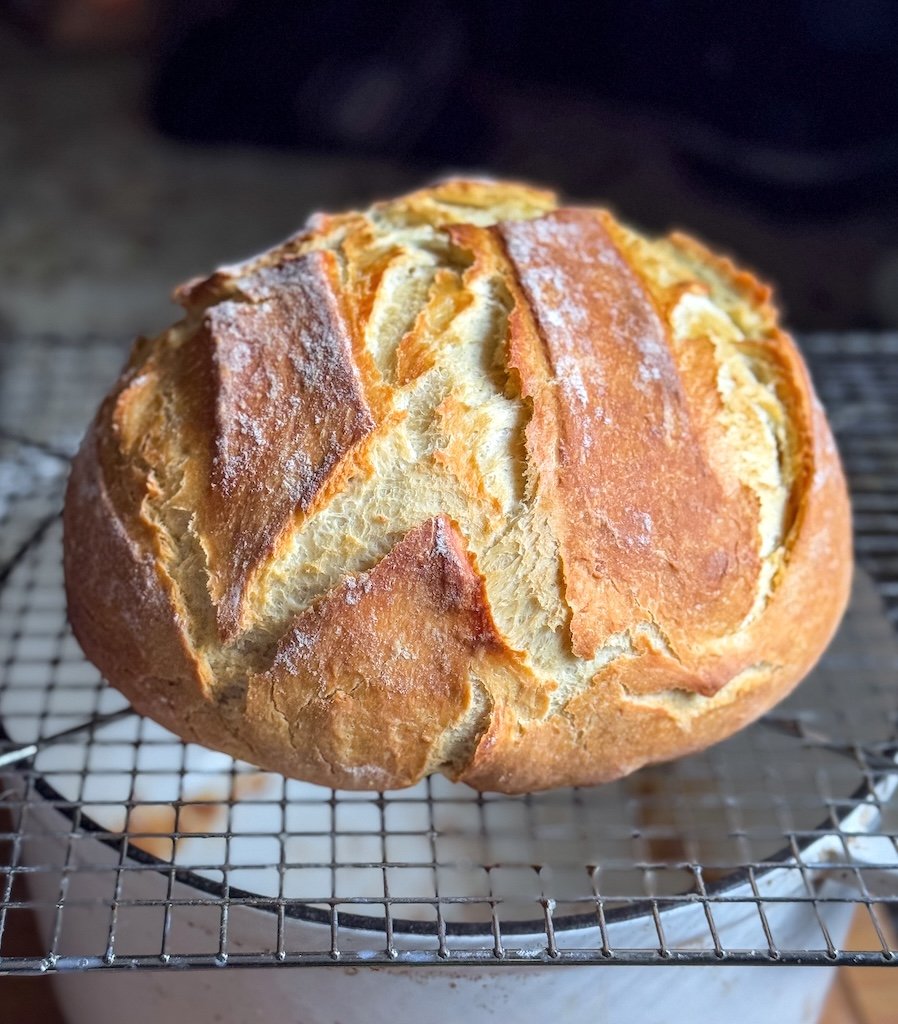
- Bake for about 45 to 50 minutes, removing the lid completely 8-10 minutes before the bread is done. This way, it will get a deeper color and crispier.
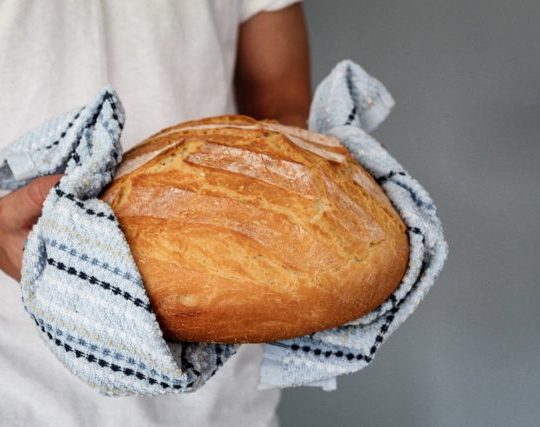
- Remove bread from a Dutch oven, wrap it in the kitchen towel, and let it cool for at least 30 minutes before slicing. Trust me on this one. If you cut it when the bread is hot, it will become sticky inside, so better wait for just a bit.
Notes
- You may skip the egg.
- You may use water instead of milk. Milk makes it soft while water makes it more rustic and just a bit chewy. I like adding a bit of both for the est results but you be your own judge.
- The outcome of the bread depends on the water temperature, oven, flour, yeast even air. This recipe has been tested and retested many times.
- You may preheat your Dutch oven to the oven or stove top and transfer bread dough into the hot Dutch oven, or you can actually make it in the regular baking pan. You do not have to use parchment paper, but I like using it.
- Don’t stop baking if the bread does not come out perfect the first time… like I said it could be many different things to affect it.
- If you going to make a larger bread, add 6 cups of flour, 1 tablespoon of Salt, and enough liquid to make it wet enough. I would say about 2 to 2 and 1/2 cups. Everything else is the same.
- Thinner or softer dough (with a bit more water) IN A WARM KITCHEN WILL PROBABLY RISE IN 40 MINUTES OR LESS.
- A FIRMER DOUGH WITH LESS MOISTURE WILL TAKE LONGER TO RISE. YEAST IS VERY SENSITIVE TO TEMPERATURE; EVEN A FEW DEGREES LESS IN THE KITCHEN CAN EXTEND THE RISE TIME SIGNIFICANTLY.
- IF YOUR DUTCH OVEN IS TOO BIG AND DOES NOT FIT IN THE MIDDLE OVEN RACK, INSTEAD YOU HAVE TO KEEP IT AT THE BOTTOM OR LOWER RACK AND TURN DOWN THE HEAT. IT WILL STILL BAKE, NO WORRIES. THIS WILL AT LEAST PREVENT BURNING. YOU CAN ALSO ADD SOME PARCHMENT PAPER AT THE BOTTOM JUST TO MAKE SURE. I usually use 3 qt or 5 qt Dutch ovens. For this exact recipe, a 3.5 qt size is perfect!
- As I said you can make it in any oven-safe dish with a lid and in any pan. It doesn't necessarily have to be a Dutch Oven.
Nutrition Information
Yield
8Serving Size
1Amount Per ServingCalories 262Total Fat 3gSaturated Fat 1gTrans Fat 0gUnsaturated Fat 2gCholesterol 25mgSodium 614mgCarbohydrates 49gFiber 2gSugar 1gProtein 8g
This data was provided and calculated by Nutritionix. Nutrition information isn’t always accurate, but we try our best.
 Skillet Fried Chicken Breast
 Homestyle Doughnuts


September 25, 2018 at 1:54 amI think your Dutch Oven bread recipe sounds good. I have a 2 qt iron one and have made no knead bread with only 3 c flour so I wonder how best to modify the recipe to fit my smaller pot.
Thanks in advance for your suggestions!
October 1, 2018 at 2:40 amHm! That’s definitely a smaller pot. So I would do:
• 1 pinch sugar
• 1/2 pack dry active yeast
• 2.5 cups All-Purpose Flour
• 1.5 teaspoons Salt
• 1 cup Lukewarm water (more if needed)
• 1/2-1 tablespoon Olive Oil
let me know if that helped and thanks! 🙂
April 2, 2020 at 4:14 pmI too jave a 2qt ceramic one. I notice theres no egg in the modified recipe (thanks for sharing), was it missed or its recommended to not add it?
Can’t wait to try this so I can one up my sister?.
April 3, 2020 at 2:34 amYes, you can use an egg but it is not neccecery. A bread dough rich with egg will rise higher because eggs are a leavening agent. I hope that helps. I wanted to show how it looks both ways. Good luck! 🙂
November 16, 2019 at 10:30 pmI made it in my dutch oven, it was awesome, making it again now. Its a bit colder outside/in the house today so.im curious if it will rise as fast. Anyway just wondering what does that tiny bit of sugar do? It seems so small as if its not necessary. (Second time ever making homemade bread) thanks!
November 21, 2019 at 5:07 pmSugar is food for the yeast
October 1, 2018 at 2:26 amDo you preheat the dutch oven before cooking? It doesn’t look like it in the recipe, but I am curious if you’ve ever tried that method.
October 1, 2018 at 2:33 amYes, i have tried that before. Depends… sometimes i just let dough rise in the cold dutch oven and sometimes i heat it and drop the dough in. Technically, i think you should preheat it.
January 1, 2019 at 2:18 pmI made this bread for our Christmas dinner; normally I do the longer rest time but didn’t get going the day before so I found this recipe instead. Then, I had to alter the cooking time slightly as I was making a prime rib at the same time, so I ended up starting it out at 500 degrees, then lowering to 350 to line up with the meat (figured if I had to ruin one, it should not be the $60 roast!) It came out beautifully!! I added some small chunks of Asiago cheese and some coursely ground pepper. It was delicious. This will definitely be my go-to recipe from now on!
January 1, 2019 at 2:38 pmI can’t even tell you how happy your comment just made me. I am so glad it turned out well, and thanks for letting me know. I really appreciate it! You can definitely add like olives in the bread or cheese… when one basic bread works all the others are so easy. Cheers… and Happy New Year!
March 14, 2019 at 12:07 amLove the recipe. What wouldI do to add garlic and Asiago.
January 7, 2019 at 2:36 amThis was my first try at homemade bread:) It turned out pretty good but didn’t raise much and was a little tough. What should I do differently?
January 7, 2019 at 2:48 amThere are a few things that you can do or change. Sometimes the flour is not good, or yeast, room temperature and air, how much water, etc. Sometimes measurements don’t work so you got to adjust and feel it while making the bread. Here are the best tips for the bread.
https://blog.kingarthurflour.com/2014/08/04/my-bread-didnt-rise/
— also, you can try my no knead bread which is perfect for beginner. I wish my comments didn’t disappear when I transferred my blog so you can read all the feedback. Ok this is the easiest bread ever.
https://sandraseasycooking.com/2018/03/no-knead-homemade-bread.html
January 12, 2019 at 8:38 pmHi there!
This was my first time making bread in a dutch oven and this recipe rocks!! I left the lid off the last 10 min but it didn’t get as beautifully golden as yours – I didn’t want to overbake it so took it out. It was still delicious but I would have loved to get that color – any tips for my next attempt?
January 13, 2019 at 1:54 amI am so happy that yours turned out delicious, and thank you so much for making it. For the golden color, I would say just turn the broiler on for a minute. You can brush some butter and turn the broiler on high just for a minute or less. It will get that nice color. 🙂
June 18, 2020 at 1:38 pmHow long do you knead the bread for each time you do it?
June 19, 2020 at 5:56 pmIf you are doing it by hand, around 10 minutes, more or less. It is, of course, much easier with a stand-up mixer with the hook attachment- The dough comes together pretty fast. You are looking for sticky but it holds the shape and pulls away from the bowl much easier. I hope that helps!
January 13, 2019 at 6:46 pmI just made this and it turned out amazing! Thank you for the recipe!
January 13, 2019 at 8:06 pmThank you so much for trying!!! I am really glad that you liked it. 🙂
January 20, 2019 at 9:27 pmThanks for the great recipe! FYI–in the instructions it says the resting time is 3 minutes. I believe you mean 3 hours. 😉
January 20, 2019 at 9:34 pmHaha… Yes! Good catch. Thanks for letting me know. It’s actually 1 to 3 hrs. depending on the room temp, air, yeast… It got to at least double in size. Have a wonderful day! 🙂
January 31, 2019 at 4:55 pmI have a 5qt camping Dutch oven. It is wider than it is tall. Do you think this recipe would be suitable the way it is, or modified? Thanks in advance.
January 31, 2019 at 6:01 pmI believe that you will be just fine. It is a bit bigger or wider pan, so the only thing that I could think of is that the dough will fill the gap all around. I made this one in a wide ceramic 10″ skillet with a lid and it was okay. Good luck!
February 1, 2019 at 3:21 pmWhat are the delicious looking toppings you put on your bread in the photo?
Looks amazing!
February 3, 2019 at 2:49 amHaha, it’s just butter and jam! One of my favorite??
February 3, 2019 at 2:45 amP E R F E C T!!!! First try and it turned out to be, by far, the best loaf of bread I have made to date. I used a Lodge Cast Iron Dutch Oven and closely followed the recipe that you provided here. The crust was a beautiful golden brown and the crumb was exactly what I wanted, tasty and substantial but not dense at all. Served it with butter and had it with Chicken Piccata. WOW….soooo goood! Thank you for taking the time to share this recipe. For those of you that are still on the fence and haven’t tried it Just Do It!
February 3, 2019 at 2:49 amWow!!! You just made my day. Thank you so much for making this bread, and for taking YOUR time to comment! I truly appreciate it.
February 26, 2019 at 9:11 pmSince buying my cast iron dutch oven, I’ve tried many bread recipes. I made your Dutch Oven Bread recipe today and it is far superior to any of the others that I tried, both in appearance and flavor. This is a keeper. My search for the best dutch oven bread recipe is over. Thank you so much. I can’t wait to make it for family when they visit in the summer.
February 27, 2019 at 4:21 amI am so glad to hear, Leslie! I really am?. Nothing beats homemade bread and this one is so easy as well as my no-knead recipe. Thank you so very much for making my recipe. You couldn’t make me happier!
March 10, 2019 at 10:40 pmThank you! I spent an hour browsing Pinterest looking for my first Dutch oven bread recipe. This was it and it turned out wonderful! I used a 3QT cusinart and it was fine. So awesome.
March 11, 2019 at 12:19 amI am so happy to hear!!! We really love this bread and I have been making it for years, but I am always glad to hear positive feedback. Haha, it never gets old 😀
Thank you so very much for trying it!!!
March 12, 2019 at 6:35 pmI am needing to make bread for 40
people and would love to us this recipe! How many servings do you think each loaf can make?
March 12, 2019 at 9:47 pmI think 3 bread loaves would easily feed 40 people. Thanks!
March 16, 2019 at 4:41 amHow long would you say it stays fresh? I am thinking I am going to have to start making it a day or two before I plan to serve it.
Thanks in advance! I’ve made this recipe a few times but it never lasts more than a day because we eat it up!
March 16, 2019 at 4:46 amHaha, i know… well, I would say that this bread is pretty okay two days later. After baking, allow it to cool down completely, then pack it in a large ziplock bags. That way it will not get dry. I never kept it in the fridge so I wouldn’t recommend that option :)) Good luck!?
March 17, 2019 at 6:44 pmI heard about this amazing bread recipe, so I ran out and purchased a 7 quart Dutch Oven. ( I figured I could use it for other meals) but I can’t seem to find a bread recipe for a 7 quart pan. Your bread looks amazing . Can you suggest amounts of flour, yeast, salt and baking time for me ? Thanks!
March 17, 2019 at 7:24 pmAww, thanks so much! So, you can use this recipe for 7Quart, however, if you want a bit bigger, here is the amount of ingredients. The Method is the same.
* 1/2 cup warm milk
* 1/4 teaspoon sugar
* 1 pack dry active yeast, about 2 teaspoons
* 6 cups All-Purpose Flour + some for dusting
* 1 tablespoon Salt
* 1 1/4 cup Lukewarm water, add a splash extra if needed
* 1 egg, mixed (optional)
* 1 tablespoon Olive Oil
March 17, 2019 at 7:24 pmGood luck!!!??
March 16, 2020 at 6:56 amHi! Have you tried this recipe using wheat flour? I’m curious if I’d get similar results seeing as that’s all I have on hand at the moment. Any advice would be greatly appreciated!
May 20, 2019 at 7:47 pmDang it. Just bought a 4 quart cast iron Dutch oven. Want to make whole wheat bread in it – vegan version
Could you possibly tell me the amounts of ingredients to use?
This looks beautiful!
June 8, 2019 at 8:45 pmI love the look of your recipe! I’m just wondering if you have this recipe in weight measurements as I live outside the US and so
I find that cups and teaspoon measurements vary.
June 8, 2019 at 9:01 pmHi Courtney, I will measure it myself and add the correct measurements in matrices and imperial. Give me a few… On the hand, while you wait for this one, I have a full proof recipe that could be used for a Dutch oven.
No-knead Homemade Bread
https://sandraseasycooking.com/2018/03/no-knead-homemade-bread.html
June 10, 2019 at 1:50 amThanks Sandra,
I’ll give it a go too!
June 9, 2019 at 7:38 pmThank you so very much for this recipe. I have made it 3 times to far and it has been the best loaf I’ve ever made.
The last version I added a few tablespoons of dried rosemary to knead in after punching down to rise the second time. Another perfect loaf to share with my family . <3
June 9, 2019 at 7:44 pmAww… Thank you so much for your feedback. I really appreciate it! Yes, this is a pretty good starting recipe. You can add anything that you wish. Have a great day. 🙂
June 28, 2019 at 3:02 amI LOVE this recipe!!! My first time making bread yesterday and it turned out perfectly! I’ve since made a garlic and rosemary, cinnamon and brown sugar, AND olive loaf using this base bread! Absolutely recommend it 100%!
July 10, 2019 at 5:19 amJust made this today and came out beautiful. Definitely a keeper. Wish I could post a picture of it here.
July 10, 2019 at 5:31 amOh, that’s wonderful!!! I’m so glad to hear. You can tag me on Instagram @sandraseasycooking so I could repost with full credit to you, of course. Or email me and I’ll repost it. Anyhow, thank you so much for making it.
July 11, 2019 at 10:40 pmHi! Do you know how bread flour would do as opposed to AP? And what about making it in a 5.5 QT dutch oven, would that be too small?
July 11, 2019 at 11:21 pmNope! 5.5 QT is actually perfect for this recipe. I am in a process of editing a video for this recipe and I used 5.5 QT. As for the flour… Hm! I used a mixture of AP and whole wheat, also just Whole Wheat or multi grain with dif seeds work well. What type of flour are you aiming at? Do you have any particular that you favor? I can def test it. Thanks!
August 26, 2019 at 10:56 amI made this bread yesterday with my 8 year old that loves to help in the kitchen! It turned out amazing! My 13 year old probably ate half the loaf so I’m making another one today! What’s the best way to store fresh baked bread like this to keep that nice crunch? I let it cool and put it in a ziplock but now it’s pretty soft and I love that crunch. Also, do you think I can reheat the bread in the Dutch oven to bring back some of that crunch? Or maybe I just need to make another one and store it how you recommend. Thanks for this great recipe and next time we make it I’ll be sure to send a pic! Love your instagram page. Your photos are amazing! Wish I could learn to take such great pics. I especially love your black and white cow on your other instagram! ❤️Heuerfivefarmstead
January 21, 2022 at 9:16 pm@Lindsey, I have seen that every person wants to express their feelings but they are not able to express their feelings properly in words but the content you have written in your post is very beautiful, it seems that you have expressed your feelings Has expressed. Hi, you are a person who writes a very beautiful post, in the same way, you keep writing new posts in your life, our best wishes are with you. https://nightlifencr.co.in/
October 21, 2019 at 2:19 pmWaaaaahhhh!!!
I’ve been wanting to try a Dutch oven bread for a while now. Yesterday I dove in and made your recipe. Honestly. I have never made a more beautiful loaf of bread in my whole life. I was so proud of it that I did a whole photoshoot with it. It turned out perfect.
Thank you so much for this recipe.
December 11, 2019 at 12:33 pmHi Sandra,
I have always wanted to try a dutch oven bread and I must say that the bread turned out to be awesome.
Recently my dad has had some issues with gluten, so I would like to know if the recipe would still be the same for a gluten-free bread.
Thank you so much.
December 12, 2019 at 2:30 amThank you very much for your kind comment. For the Gluten-free option, I would suggest using Bob Red Mill Gluten Free 1-to-1 Baking Flour. I just linked it so you can see which flour I am referring to. It will not be the same, of course, as a loaf of regular bread, but not bad. I have I hope that helps!
January 28, 2020 at 2:07 pmI was so excited to make this and it was great!! I couldn’t use my dutch oven (only goes to 400*) so I used my cast iron frying pan and made a tent. Could I have cooked this at 400*? Also, I was wondering about adding green olives and if so, how many? Thank you.
January 29, 2020 at 12:57 amWell, Dutch oven is just a pot with a fitted lid. I used a ceramic pot before as well before. You could also cook it at 400F… I baked it at that temp many times. Although, cast iron is an amazing alternative, of course. As for olives, I would say maybe 1 cup of sliced or chopped olives, you can also use mix of different olives for the colour and flavour. I would add olives the minute dough start to come together. You could use stand mixer o knead them in with your hands. Good Luck!!!
February 20, 2020 at 9:24 pmThe written recipe doesn’t say to put any oil IN the dough mixture. The video shows it going in with the egg and water. I’ve got a batch of dough on its second rise with no oil as I did not watch the video. I hope it turns out.
March 9, 2020 at 11:28 pmSo you probably won’t see this in time but my Dutch oven is only safe to 400. How long should I cook it at that temperature, and should I do it on convection or regular bake? Thanks so much whenever you see this!
March 10, 2020 at 7:32 pmThat is just fine. Do everything the same, just bake it for 35 minutes at a normal baking oven setting. For conventional ovens, I would definitely do 25 to 30 minutes, but do check after 25 minutes if the bread is golden. You can take the lid off 10 minutes before the bread is done to reach a deeper color. Do not cut the bread the first 30 minutes either, let it cool a bit on cooling rack propped on the side, wrapped partly with a cotton kitchen towel. Also, if it feels lighter when you take it out of the pan, it is done for sure. Good luck, and never hesitate to ask me. I am always available on Instagram so you can send me DM.
March 16, 2020 at 12:39 amHIiiii….In your instructions, it says to do the second rise THEN more the bread to the dutch oven, score it and i assume just throw it in the oven? In the video however, you scored it, did the second rise in the dutch oven then straight into the oven—-this seems more correct to me but could you clarify which is the right way to do it? I”m putting in a loaf right now using the method described in the recipe, so hopefully it works?!
March 16, 2020 at 10:43 pmHi! I am sorry for the confusion… sometimes I do before and sometimes after, however, I believe that scoring is done after the bread finally rises and just before the loaves go in the oven. These splits give the bread more room for the final rise in the oven without splitting the closed seams. I hope that makes sense.
March 29, 2020 at 4:40 pmHi, in place of all purpose flour can I use “Bread flour”?
April 3, 2020 at 2:36 amYes! It’s all about the protein- All-purpose flour has between 8 and 11 percent protein, while bread flour contains between 12 to 14 percent.
That extra protein in bread flour results in a slightly higher rise.
April 2, 2020 at 11:14 amI have tried this twice and both times it turned out great. My family is enjoying home-made bread for the first time. Thanks heaps!
April 3, 2020 at 2:35 amI am so happy to hear, Jasper! Happy Baking!!!
April 5, 2020 at 7:42 pmCan you make this the night before and then bake the next morning?
April 8, 2020 at 1:02 amYes, Eva! You certainly could make it a night before, keep it on the fridge. Give it about 30 minutes for the dough to rise up and get to room temp. then preheat your oven and dutch oven as well.
May 8, 2020 at 4:53 pmHow do I modify if using instant yeast ?
Thanks ahead !!
May 10, 2020 at 1:29 amSimply use less yeast. To substitute instant or rapid-rise yeast for active dry: Use about 25 percent less.
April 7, 2020 at 2:53 pmI would like to try this bread recipe and was wondering if I can start by mixing everything in the right order but in a kitchen aid
April 8, 2020 at 12:59 amYES! Add everything and just mix in your kitchen aid. You should be good to go!
April 7, 2020 at 7:59 pmI am so excited to try this bread recipe! If I were to preheat the dutch oven, how long would I need to preheat it for? Would I just place the dutch oven in the oven as it is preheating or do I have to let the oven preheat and then place the dutch oven in there? Thank you!
April 8, 2020 at 12:58 amPut it into a cold oven and let the two preheat, slowly, together. Drop a bit of oil, smear all over and heat it. I hope that helps. Good luck! I am excited for you too.
April 12, 2020 at 8:04 pmI have active sourdough starter that I have been feeding for the past 2 weeks, Do you have a recipe to make bread in the dutch oven for that? Thanks!
April 18, 2020 at 1:55 amIs it okay to use almond or oat milk instead?
April 22, 2020 at 12:47 amYes, but you can use water too. 🙂
April 18, 2020 at 4:26 pmJust made the dough, which is rising as we speak. Thought I’d watch the video while I wait and noticed that the written instructions don’t mention the oil is supposed to be mixed with the water and egg. So…… what should I expect without the oil in the dough mixture? (I used the tablespoon of olive oil to coat the dough while it rises.)
April 22, 2020 at 12:46 amIt should be fine. Don’t panic:)) I just wanted to show you that you can make it either way and it will be just as good.
April 18, 2020 at 8:19 pmThank you Sandra, this is the first time I ever baked bread and I am glad I did! I found your recipe and instructions here to be the best. The bread tastes so good toasted and with butter and fruit preserves. I’m now cooking my third loaf using this technique — I tried another one from YouTube and it didn’t come out as good!
April 22, 2020 at 12:45 amThat’s wonderful! Thank you so much for making it and for letting me know. Happy Baking!!!
April 21, 2020 at 3:24 amHi!! I have not an dutch oven, can I replace it with another thing?
April 22, 2020 at 12:40 amYou can bake it in just a regular baking pan. Ceramic baking dishes are great substitutes for a Dutch oven because they usually come with lids and they can go in the oven as well as stock pots. I hope that helps. Good luck!
April 24, 2020 at 11:39 pmMy Dutch oven can only be used up to 400 degree, will this recipe still work at the lower temp
April 25, 2020 at 2:49 amYes!!! It will work. 🙂
April 25, 2020 at 1:51 amHi – my husband and I made this bread today in our dutch oven and it turned out pretty good. It was our first time ever making bread. :). The only thing is that the inside is a little bit doughy. Could that be because we didn’t have enough water in the dough or maybe we didn’t cook it long enough covered? Any feedback you can give would be greatly appreciated.
Thanks!!
VK
P.S. I’ll now be using your site for more recipes. :))
April 26, 2020 at 10:01 pmHi there! My friends swear by your bread recipe & love it! It’s my first time trying it and I noticed that under “ingredients”, you listed 1 tbsp of oil, but then under “instructions”, I don’t see any mention of where to put the 1 tbsp of oil other than a bit on the bread as a glaze while rising. I’m curious, where does this 1tbsp of oil fit in? Thanks!
April 28, 2020 at 7:10 pmI am sorry about that… it is at the very end. After making bread dough just oil or grease your bowl, transfer the dough into a bowl and add a bit of oil all over the dough. I will correct that in my instructions. Thank you!
May 8, 2020 at 5:52 pmThis looks so good and easy! I just bought a 6 qt. dutch oven and was wondering if I should double the recipe? I don’t really want a flat loaf, and I’m afraid that with such a large dutch oven, it may be too big for the recipe.
May 10, 2020 at 1:27 amYou do not have to double the recipe, you can you do not have to. It will rise up instead.
May 13, 2020 at 1:49 pmNever made bread until I tried this, and it turned out perfect both times. I added olives the first time (very sad that Trader Joe’s did away with their Olive Bread) and the second time some sharp cheddar and jalapenos and it turned out great.
I’m running low on yeast. I have a little bit left but then only have rapid rise instant yeast. Will this work?
Thanks again for this great recipe!
May 18, 2020 at 11:18 pmThanks so much for making it! I think it will work… Rapid yeast is for pizzas if I am not mistaking. I made it before… although it is not “recommended” I made it because just like you, I was out of yeast, haha… You can make a quick bread or flatbread like focaccia.
May 17, 2020 at 4:11 amThis bread is great, made it today and am going to share the recipe with my niece who wants to make some too. It turned out just like your picture. Thank you.
Was wondering what is the best way to keep the bread for a day or two. Want to keep that great crustiness.
May 18, 2020 at 11:12 pmThat is wonderful! Thank you for making it. Hm! I would keep it in a large ziplock bag. That’s the best way. The crust will probably get softer but at least bread is not going to be stale. However, It is fantastic for French bread after a few days of waiting.
May 23, 2020 at 1:59 pmDo you have the measurements in grams?
May 28, 2020 at 2:00 amYes! I just added in grams/ml
May 24, 2020 at 8:30 pmI was excited to make this recipe but there are multiple typos and the instructions don’t make sense.
May 28, 2020 at 12:55 amI am sorry to hear that my recipe is confusing. I was wondering, which part of the recipe did not make sense? If you have any question don’t hesitate to ask because I am willing to clarify. As for typos, well, we are all humans and sometimes typos happen.
February 1, 2021 at 9:05 pmI have a quick question about the recipe, too! My dutch oven says never put it cold into an already preheated oven as it could crack it. How would I do the third rise? I’m sorry I’m just now understanding!
February 8, 2021 at 6:50 pmI see the confusion. So, You do not have to go through the third rise. I usually heat my Dutch oven on the lowest temperature setting of my stove, while my oven is actually heating. This will also allow the dough to rise faster. You can also use parchment paper to allow the dough to rise on the side. It will be easy to transfer to the dutch oven. I would follow the instructions for your Dutch oven. Not all are the same. I hope I was helpful!
June 7, 2020 at 1:15 amI have made this twice and it came out perfectly! Recipe was very easy to follow. I did double the sugar but followed everything else. Was wondering how I can adapt it to make olive bread.
June 9, 2020 at 2:56 amOh, that’s awesome! Hey, when you learn how to make one bread any other it’s just an experiment. I would go for it… Also, you can check my pizza dough which is fabulous for flatbread such as focaccia
http://bit.ly/PepperoniBurrataPizza
Thanks so much for making this one!!!
June 8, 2020 at 2:30 pmI am new in baking bread. Planing to buy Lodge Dutch oven for sourdough bread. Should I buy 6 qtr or 4.5 qtr ?
June 9, 2020 at 2:50 amI think you should be fine with 4.5 Qt. Most of the time I am using 5qt.
July 7, 2020 at 1:20 amI am making this for the first time tomorrow. I have a few questions:
I have a 7 quart oval ducth oven, should I make the bread with the bigger measurements so that it fills the dutch oven better?? Also, for the second rise, do you let it rise in the dutch over (step 10 confused me on this lol)?
July 10, 2020 at 5:35 pmI allow it to rise in my dutch oven for the second time even though it will rise regardless but the bread fluffiness is so much better. You can do sec rise on the side and drop it in but it is way harder to transfer, at least it was for me. Good luck! 🙂
December 22, 2020 at 4:00 amHi there! Thank you for the recipe. I’m a bit confused by the preheating of the dutch oven. Do you let the dough rise for third time in a cold dutch oven? Then heat up the dutch oven, place the dough back in and bake?
December 22, 2020 at 4:14 amHi! So you can preheat dutch oven then carefully drop your already risen dough in or let it rise in the cold one and bake at preheated oven. I’ll edit that ASAP.
January 21, 2021 at 5:05 pmI have searched for a detailed bread recipe for so long.. the dough is rising & I look forward to the end result. Very excited. Thank you
January 23, 2021 at 6:34 pmI am so glad to hear!!! I hope it turned out delicious 🙂
January 27, 2021 at 1:03 amThis is a great recipe. I have tried it a couple times now. I tried making the full recipe, and I split the dough in two, baked one piece in a small Dutch oven and the other in a loaf pan. Really happy with how it turned out. Thanks so much for sharing this.
February 8, 2021 at 9:14 pmYEYY! I am so glad to hear. Thank you so much for your feedback- it is much appreciated!
January 29, 2021 at 5:44 pmHi. I am wondering if this recipe can be modified to make rolls. If so, how would I go about doing that?
February 8, 2021 at 6:56 pmHere is the recipe for my rolls:
HOMEMADE DINNER ROLLS
October 11, 2021 at 12:31 amExcellent bread! Truly amazing! Somehow it manages to be supremely crispy, slightly crunchy, moist, tender, and fluffy — all at the same time.
Thanks for the great recipe — it’s going in the “every week” file! 😀
October 22, 2021 at 12:56 amI’m so happy to hear! Thank you so much 🙂
December 24, 2021 at 10:36 pmEverything seamed to go well but the finished product was a little dry. Where do you think I went wrong to have a more moist bread? Thanks in advance.
February 21, 2022 at 1:10 pmHow long is the third rise before scoring?
February 25, 2022 at 8:40 pmYou don’t have to wait for the third rise although it comes out much better. You can see it, approx. 15-20 mnutes.
March 6, 2022 at 8:24 pmI followed your recipe directions exactly, and my dough was not coming together at all. Then I realized that although you mentioned water in the ingredient list you never say when to add it in the actual recipe itself – only the egg and the milk. Once I corrected my mistake and added the water to the bowl it came together much better.
May 18, 2022 at 10:48 pmLove this recipe. Thanks!
May 26, 2022 at 5:21 pmI am so happy to hear! Thank you!
May 18, 2022 at 10:48 pmLove it
December 17, 2024 at 1:33 amWow!! I made this tonight and it was incredible!!! I followed all the steps including the extra kneads and just wow beat bread recipe I have ever made. Thank you so much for sharing!
December 17, 2024 at 4:04 amThank you so much, Rian, for the trust! It’s not as hard as people think and you can make any shape of bread with this dough even make friend dough.
May 31, 2025 at 12:14 am[…] Dutch Oven Bread […]
June 6, 2025 at 1:10 amI really like this recipe.
June 7, 2025 at 3:07 pmI am so happy to hear!!